The number of houses with popcorn ceilings proves that it was once a very popular finish. However, more and more homeowners are after a more finished-looking finish. This article provides you with 5 ways to cover a popcorn ceiling, arranged in order of increasing cost.
Before we get started, it’s important to know that popcorn ceilings used to contain asbestos, a toxic mineral associated with fatal respiratory diseases and cancer. Modern popcorn ceilings no longer use asbestos, but if your house is older, you may need to ascertain if it contains this harmful material before you try to cover it up.

- Add more popcorning and smooth down
- Cover with wooden planks
- Cover with drywall boards
- Cover with ceiling tiles
- Install drop ceiling
1. Add More Popcorn-ing and Smooth Down (Cheapest Option)
The process of smoothing out popcorn ceiling using more plaster/drywall is the cheapest option when it comes to covering your popcorn ceiling since all you need is joint compound and application products.
This process, called skim coating, is simple to follow and makes a smooth, even look.
Equipment
| Item | Amazon link |
| Joint compound | View |
| Mud pan | View |
| 5-gallon bucket | View |
| Roller | View |
| Taping knife | View |
| Mud mixer | View |
| Drill | View |
| Drywall sander | View |
Method
The above video provides a great demonstration of this technique, including some tricks, but below is a brief breakdown of the method.
- Diluting the joint compound in a large bucket using a drill with a mud mixer attachment. As per the video, you want a yogurt consistency.
- Apply the mud to your ceiling (using a roller is a great way to ensure an even coat and easy application). You don’t want the mud to dry before you can scrape it smooth, so if you ceiling is large, do it in sections.
- Smooth the mud on the ceiling with your taping knife and wipe off any excess into your mud pan (it will likely take two coats to get rid of the texture completely).
- Leave the initial coat to dry before applying the second.
- Apply skim coats until the popcorn texture is no longer visible.
- Sand the ceiling and apply paint.
Pros
- Inexpensive. This method is the cheapest because all it involves is joint compound and application materials.
- Easy. Using the roller method, even beginners can get a smooth wall with this method.
Cons
- Needs care. While this method is not difficult, it does take some effort and care to apply the skim coat completely evenly. It will similarly take patience to sand the wall once finished.
- Not mess-free. Sanding drywall is a messy process and you will likely need to cover your furniture or move it from the room while doing this.
Cost
COST = < $100

This process will likely cost under $100 since five gallons of joint compound costs around $70 and will be enough to skim coat over 140 sq. ft with multiple coats.
It will cost more to buy the tools needed if you do not already possess them, but it is still an inexpensive way to cover the popcorn ceiling.
2. Use Wooden Planks to Conceal the Popcorn Look
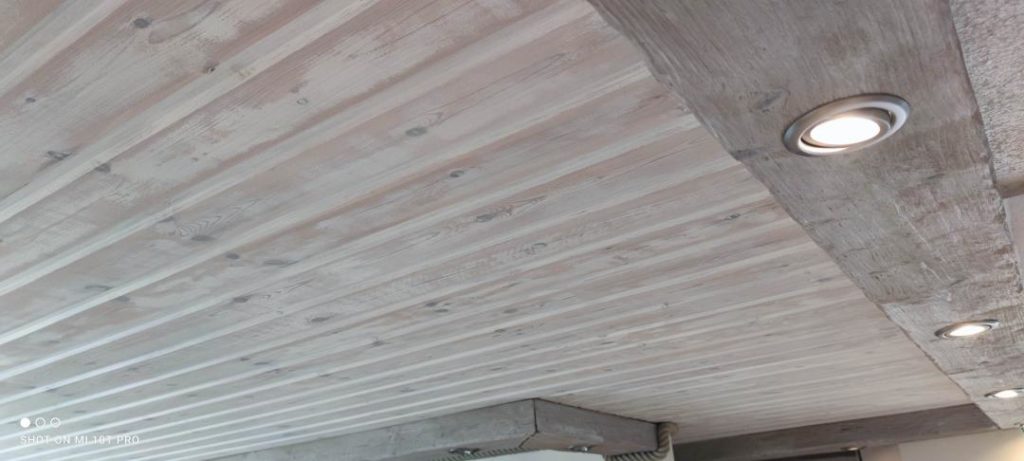

If you are after a hassle-free way to cover your popcorn ceiling, applying planking will do the trick.
This method involves fewer tools and steps than drywall or ceiling tiles and costs are limited to the cost of lumber and nails (and labor if you are not DIY-inclined).
This look is also highly customizable as you can choose your wood, plank width, and stain/paint to achieve the desired look. You can also extend it down onto the walls in areas like the basement.
Equipment
| Item | Amazon link |
| Lightweight wood planks | View |
| Stud finder | View |
| Chalk line | View |
| Jigsaw | View |
| Liquid Nails | View |
| Nail gun | View |
| Nails | View |
| Measuring tape | View |
| Pencil | View |
| Ladder | View |
| Miter saw | View |
Method
- Decide on the wood you prefer. Wood planks with tongues and grooves are more expensive than without but they ensure a clean and secure look for your ceiling.
- Determine which way your ceiling joists run so that you can run your planks perpendicular to the joists. Use a stud finder or just probe with nails to determine where your ceiling joists are located. Mark them using a chalk line.
- Stain or paint your planks before applying them.
- Use a miter saw to cut every other edge plank to create the look of staggered seams for your ceiling. Use a jigsaw to trim planks near lighting fixtures or vents.
- Install the first row of boards by applying Liquid Nails and nailing them into the joists where marked. Leave a gap around the edge of your ceiling to allow for swelling. This gap can be covered with trim after your planks are installed.
- Snap in each row following the first before securing it to the ceiling to make sure the boards fit together correctly.
- Then use Liquid Nails and nails to secure the boards. This process is easier with multiple people.
- Once the entire ceiling is covered, apply your trim and caulk any cracks in the edges to ensure a clean look.
Pros
- Ease of installation. It might take you a moment to get into the swing of it, but installing the wooden planks is a repetitive process. Using the tongue and groove planks makes it even easier.
- Appearance. Wood paneling has a unique and rustic appearance that can enhance the look of many rooms.
- Longevity. Depending on the type and quality of wood you use, the ceiling will require very little upkeep. It is sturdy and less vulnerable to chips, scratches, warping, and punctures compared to something like drywall.
Cons
- Time. Wood takes longer to paint and install than something like drywall since it comes in smaller pieces. If you are doing the job on your own, it can also be quite time-consuming and tiring to go up and down the ladder getting the planks.
- Maintenance cannot be skipped. While wood is durable, a lot of it depends on how well you take care of it. Wood is vulnerable to insects, water, etc., and so you need to make sure you keep up with the painting, varnishing, and treatments.
Cost
COST = up to $300 for good quality wood
The cost of wood paneling will vary widely. This project can be done for as low as $30 using the cheapest wood. However, you will not get wood panels as perfectly aligned and may have better luck leaving a slight (less than ¼”) gap between each panel.
. Easy DIY Glue up Application on Any Flat Surface or Popcorn Ceiling.")
Other wood paneling options can cost as much as $300 for 140 sq. ft, but the wood will be more uniform and higher quality, so the higher cost may be worth it for some.
3. Cover the Popcorn Ceiling With Gypsum Board/Drywall
Covering a popcorn ceiling with drywall is an extensive project but well worth it if you want a permanent and inexpensive solution for your ceiling.
Installation of drywall over your popcorn ceiling involves cutting, lifting, screwing, mudding, sanding, and painting drywall. It is a long process, but it is less expensive than other options if you have the right materials.
Equipment
| Item | Amazon link |
| Caulk gun | View |
| Chalk line | View |
| Drywall sander | View |
| Drywall saw | View |
| Dust mask | View |
| Framing square | View |
| Knockdown knife | View |
| Mud pan | View |
| Safety glasses | View |
| Taping knife | View |
| Metal shears | View |
| Utility knife | View |
| Electric stud finder (optional) | View |
| Sheetrock lift | View Or rent one: View (Home Depot link) |
| ½” drywall sheets | View (Home Depot link) |
| 2″ drywall screws | View |
| Joint compound | View |
| Painters tape | View |
| Tear-away bead | View (Home Depot link) |
| Mud rings (may be unnecessary) | View |
Method
When it comes to buying materials, try to find drywall sheets that span the length of your room. Avoiding butt joints, where the lengthwise edges of two sheets of drywall meet, will save some hassle in the installation process.
Drywall sheets today are almost all made of gypsum board, a lightweight and strong alternative to classic drywall. You will want to use gypsum board drywall for this project.
- Find the joists in your ceiling using either an electronic stud finder or by probing with nails. Mark these joists with a chalk line.
- Extend any electrical boxes in the ceiling with mud rings.
- Cut your drywall sheets so that the ends meet the center of your joists. Use your framing square to make square adjustments to the sheets.
- Use a drywall lift to hoist up the drywall. Leave ¼” gaps between the drywall and the wall.
- Screw along the edges of the drywall and some in the center. Make sure screws line up with the joists.
- Measure and cut your tearaway bead to fit the space.
- Staple the tearaway bead to the drywall with one edge of the bead tight against the wall. Staples should be about 8″ apart.
- Mud the edge of the drywall along the bead using your joint compound, taping knife, and a mud pan.
- Mud along the joints and over screw holes.
- Once the mud is dry, sand it down so it is even.
- Paint your new ceiling before pulling the tear-away bead.
- Tear off the flange from the tear-away bead.
- Caulk the crack between the ceiling and the wall and touch up paint.

Pros
- Ability to cut holes in ceiling. Since you will be covering up your old ceiling by the end of this project, you can use this opportunity to add or move lighting fixtures or ceiling fans.
Cons
- Time-consuming and labor-intensive. Drywall installation takes at least a day to execute well and will take manpower.
- Messy. Finishing drywall is a messy process. You will need to have everything removed from the room and make sure you are wearing a dust mask and old clothes for this process.
- Easily looks bad. Drywall is not the highest quality product (although it is widely used and reliable enough to be used this widely), so it can easily start to look dirty, scuffed, or warped if you do not pay attention to the maintenance.
Cost
COST = $100-$200 for 150 sq. ft room
Cost is going to depend on the size of the room and what materials/tools are possessed beforehand. The cost of labor/professional help may be a factor as well since it is likely not a one-person job.
Including the cost of small materials, drywall, joint compound, and drywall lift rental (assuming that you own all other tools), this project will run around $100-$200 for a 150 sq. ft room. Larger rooms will cost more, about $.75-1.50 per sq. ft.
4. Affix Ceiling Tiles Over the Ceiling
Ceiling tiles can be installed directly on the popcorn ceiling, screwed directly into ceiling joists.
The installation process is easy since you can buy complete kits that have comprehensive installation instructions.
Equipment
| Item | Amazon link |
| Ceiling tile installation kit and ceiling tiles | View |
| Drill | View |
| Drill bit | View |
| Screws | View |
| Measuring tape | View |
| Chalk line | View |
| Razor anvil cutters | View |
Method
Specific installation instructions vary depending on the brand of the ceiling grid. Check your product online to find the official instructions for the brand you choose.
Installation of the CeilingConnex grid system linked above will involve mounting L-brackets along the top edge of the ceiling about ¾” to 1″ below the ceiling joints. Brackets should be fastened every 1.5 to 2 ft using screws.
You will need to plan your room layout to decide how you want your ceiling tile grid to look. You may need to trim ceiling tiles using an anvil cutter in order for them to fit.
Mark out your ceiling joists using a chalk line and mark where your tiles will be if running perpendicular to joists.
Main runners should be fastened every 16″ to 24″. Next, install ceiling tiles and cross T’s by snapping them into place.
, Pack of 96, Plain White")
Pros
- Ease of installation. Ceiling tile systems are relatively easy to install—easier than drywall.
- Good option for low ceilings. Some of the other options involve extending the ceiling down. Ceilings actually have a minimum height limit. In addition, there are many benefits to keeping it even higher than this, so affixing the tiles directly onto the popcorn ceiling is ideal.
Cons
- Adherence issues. Since the surface onto which you are adhering the tiles is uneven due to the popcorning, you have to pay attention to how you attach the tiles to the existing ceiling.
Cost
COST = $400 for 140 sq. ft room
The cost of a ceiling tile kit will likely average around $400 for a 140 sq. ft room. It may be cheaper to buy ceiling tiles, L-brackets, main beams, and cross T’s separately, but it depends on where these materials are sourced. Larger rooms cost more.
If you have lightweight ceiling tiles, you can attach them directly to the ceiling with an adhesive, making it the easiest method available and cheaper than the installation kits.
5. Install Drop Ceiling
You’ve likely seen a drop ceiling if you’ve ever been in an office or school building. The grid formation with removable tiles offers a versatile, easy cover for your popcorn ceiling.

Drop ceiling kits are available, or the grid formation can be customized to your space by buying all of the individual elements separately.
Drop ceilings are sometimes appropriate, but ceiling height is regulated by the IRC and needs to be taken into account.
Equipment
| Item | Amazon link |
| Safety glasses | View |
| Tape measure | View |
| Hammer | View |
| Utility knife | View |
| Straight edge | View |
| 2’ or 3’ carpenter’s level | View |
| Pencil | View |
| Tin snips | View |
| String or chalk line | View |
| Clamp | View |
| Wire cutters | View |
| Magnetic level | View |
| Drop ceiling kit | View |
| Ceiling tiles | View |
Method
Installation of your drop ceiling depends on whether you choose to use a drop ceiling kit or to buy all of the elements separately to make your own custom drop ceiling.
If installing a kit, consult with the included instructions for installation or check the brand’s website for instructions. Linked above are all of the materials necessary to install an Armstrong Quick Hang Suspended Ceiling Kit.
Here is a Youtube video for a step-by-step walkthrough of the installation process of this kit:
In general, the installation of a drop ceiling follows a basic process:
- Plan the grid for your space by measuring your space and determine the amount and size of tiles desired.
- Install the L-shaped brackets around the edges of your ceiling (this is where levels and chalk lines come in handy to make sure the ceiling is even).
- Identify how you want to space your main beams. Use a chalk line to mark their placement on the ceiling.
- Hanger wires or hooks and brackets are placed along these lines (max. 4 ft apart) to hang main beams.
- Trim main beams.
- Install the end of the main beams into the L-shaped brackets and then the beam will be attached to the hanger wire/ hooks.
- Install cross Ts.
- Once the entire grid has been installed, ceiling tiles are slid into place. They may need to be trimmed to fit along the edges of your grid formation.
Pros
- Ease of installation. Drop ceiling installation is a mess-free process with step-by-step instructions available online.
- Versatility. You can customize your drop ceiling in a variety of ways. Drop ceilings also allow you to revert to your popcorn ceiling if you decide you want to do so in the future or if you are in a rental where you can’t make permanent changes to the property.
- Easy wiring. Because you are dropping the ceiling lower and the panels are easily lifted after installation, all the new wiring you need to run for sound systems, TVs, etc., can be run quickly and efficiently, hidden away.
Cons
- Cost. Drop ceiling materials can potentially be more expensive than other popcorn ceiling covering options. However, this can vary a lot, depending on where materials are sourced and if a kit is used or not.
- Bad option for lower ceilings. You must ensure that your room will still have up to code ceiling height with your drop ceiling installed.
Cost
COST = ~$1,000 for a room that is more than 100 sq. ft
Cost depends on the size of your space but it will range from around $300-400 for a 64 sq. ft room to $1,000 for a larger (over 100 square feet) room.
Sources
https://ceilingconnex.com/pages/ceiling-grid-instructions
https://www.thespruce.com/nstall-tongue-and-groove-wood-ceiling-1821438
https://sincerelymariedesigns.com/how-to-easily-plank-a-textured-ceiling/
https://edithandevelynvintage.com/how-to-plank-popcorn-ceiling/