A bathroom fan is a vital part of your home ventilation system, removing moisture and preventing mold formation. But they don’t last forever, so as a homeowner, you will probably find yourself having to disconnect and replace your bathroom fan sooner or later.
It’s worth doing some preparation and research to make sure you do the job safely and meet all legal requirements in your area.


To disconnect the bathroom fan, start by cutting off power from the breaker to avoid the risk of electrical shock. Then go back into the bathroom and remove the cover, disconnect the wiring, remove the housing, and detach the vent pipe.
Meet Legal Requirements
Depending on your location, it may be illegal to perform electrical repairs without a permit or a professional electrician’s license.

So, before you get your screwdrivers out, check whether the law in your state allows you to perform electrical repairs on your own home as an unqualified layperson. You may need to call your local council for information.
Perhaps you will be permitted to do it as long as you have a permit and get an electrician to check the work afterwards.
Legal Requirements Ensure Safety
Safety is not an issue that should be taken lightly. Undertaking electrical repairs without expert knowledge can leave your wiring in a dangerous state.
There’s the immediate risk of electrocuting yourself while handling the fan, but also the longer-term danger to other people in the house if you accidentally leave wires exposed.
Incorrect electrical repairs are also a fire hazard. According to the National Fire Prevention Association, between 2012 and 2016, electrical failures and faults were the second-highest cause of domestic fires.
These fires caused 18% of civilian deaths, as well as 20% of property damage.
Contravening Legal Requirements Can Cost You
Performing electrical repairs yourself can also lead to a hefty fine if it is illegal in your area.
Undertaking repairs without the expertise of a qualified electrician can also lead to your home failing an annual or pre-sale inspection, which will only cause future headaches and expense.
The bottom line? If in doubt, call an electrician. It may be less expensive and save you plenty of trouble in the long run. But, if you do decide that this is a job you can take on yourself, there is a way to do it safely and effectively.
How to Disconnect a Bathroom Fan
1. Equip Yourself for the Job
There’s nothing worse than getting halfway through a job and finding you don’t have the right tool at a critical moment. So, gather everything you think you’ll need ahead of time and keep it within arm’s reach.
Tools you may need:
- Ladder (amazon link).
- Set of screwdrivers (amazon link).
- Voltage tester (amazon link).
- Knife (amazon link) to cut old caulking.
- Goggles (amazon link) (you are looking up while you work and don’t want dust falling into your eyes).
- Overalls (amazon link) (there will be a lot of dust coming down, possibly old insulation which is very itchy).
2. Turn off the Power Supply
Begin by shutting off the power to the bathroom fan at your home’s breaker panel.

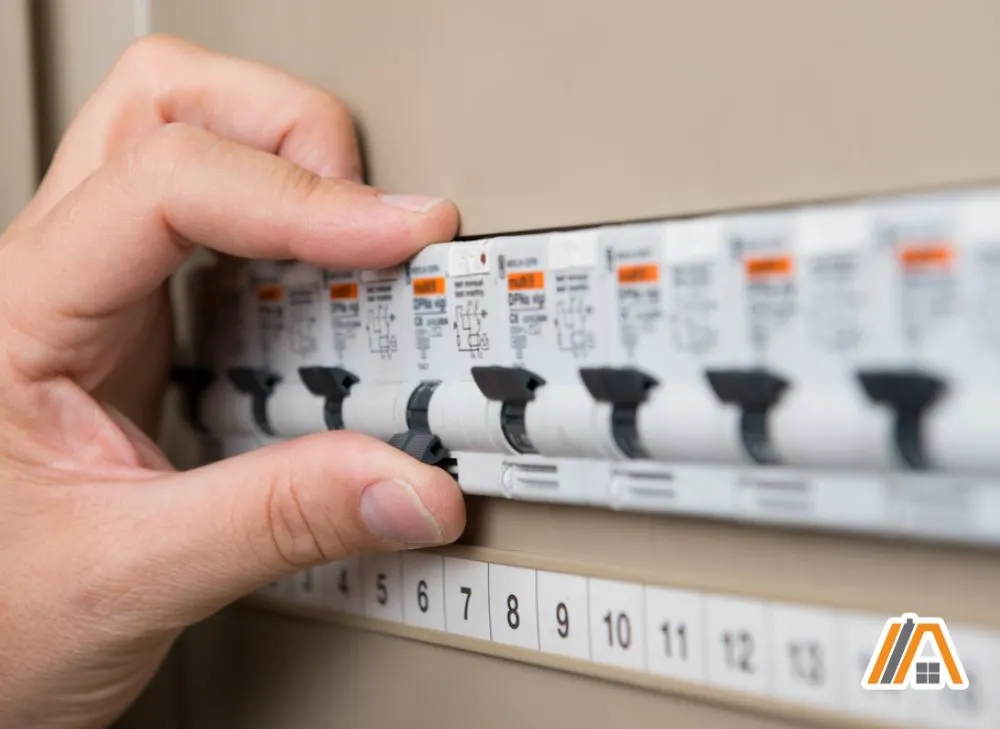
If there isn’t a switch clearly marked for the fan or the bathroom power supply, it’s best to err on the side of caution and turn off all your electricity at the main switch, remember to bring a flashlight with you when turning off the main switch.
3. Set Up Your Workstation
If your bathroom is very dark without the electrical light, set up a portable work light to illuminate your workspace.
There will likely be lots of dust and debris in your ceiling, so lay a cloth or a plastic sheet on the floor to catch it and make cleanup easier. You might also want to consider protecting other surfaces, such as vanity, bathtub, etc.
Make sure you can easily reach the fan to work on it safely. Bathroom exhaust fans are usually installed in the ceiling or high on the wall, out of easy reach.
It is dangerous to attempt to disconnect wires when you’re balanced on the edge of the bathtub or stretching to reach them without being able to see what you are doing. It’s also physically difficult to keep your arms outstretched above your head for long periods of time.
So, set up a stepladder underneath the fan, making sure it is stable and that you can clearly see and easily reach the fan housing and the wires inside.
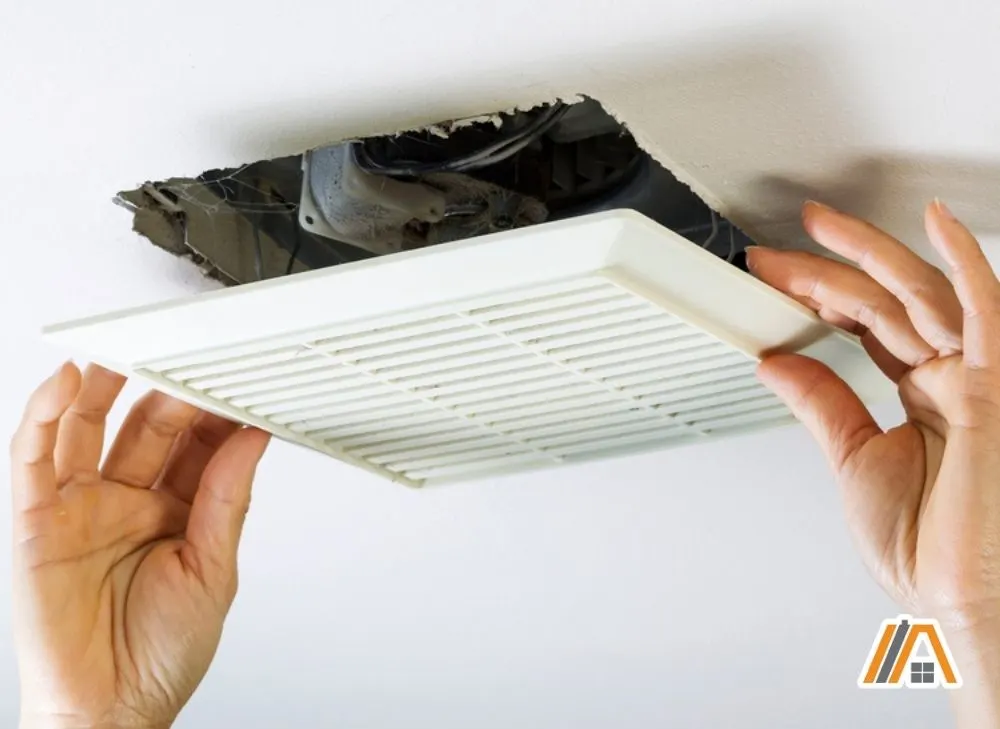
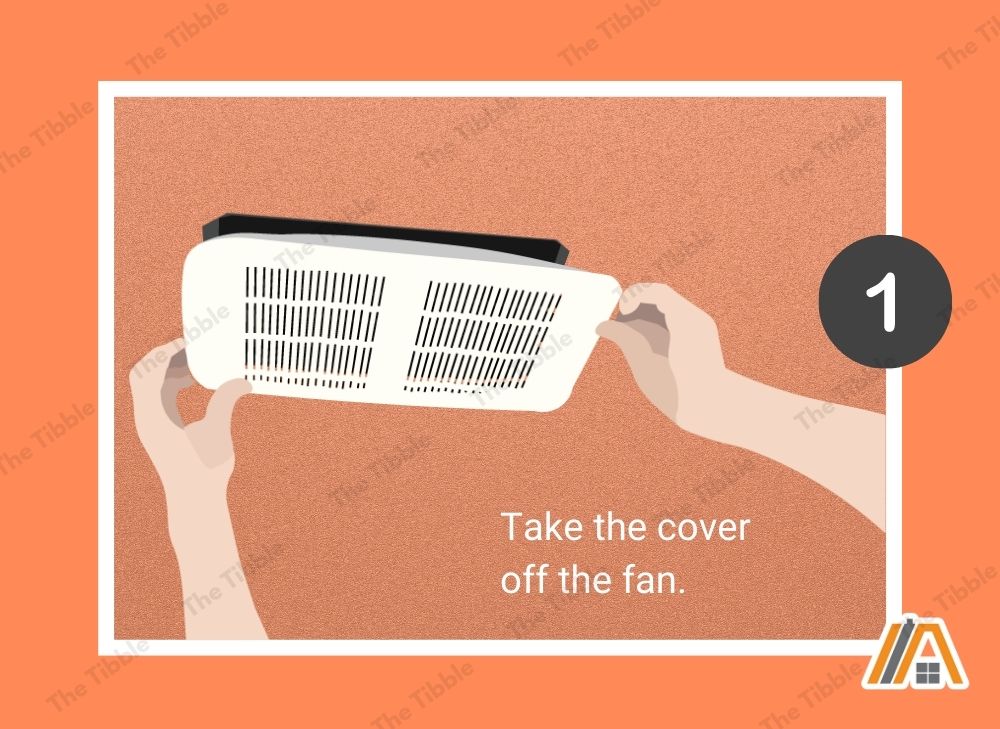
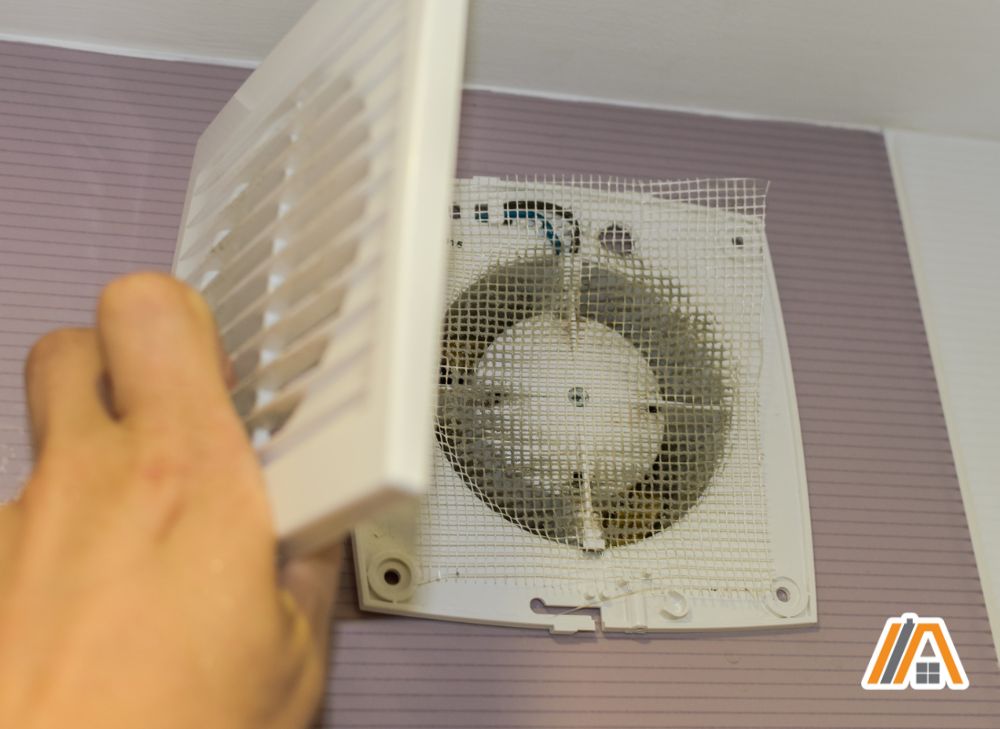
4. Remove the Fan Cover
Take a close look at the fan housing and assess how it is attached to the ceiling. It may be screwed on, in which case, simply choose the right screwdriver and unscrew it. If you don’t see any screws, the cover may be a clip-on.
If it is, you will either see a tab that you can push to unclip the cover or use a flat-head screwdriver to gently lever it off.

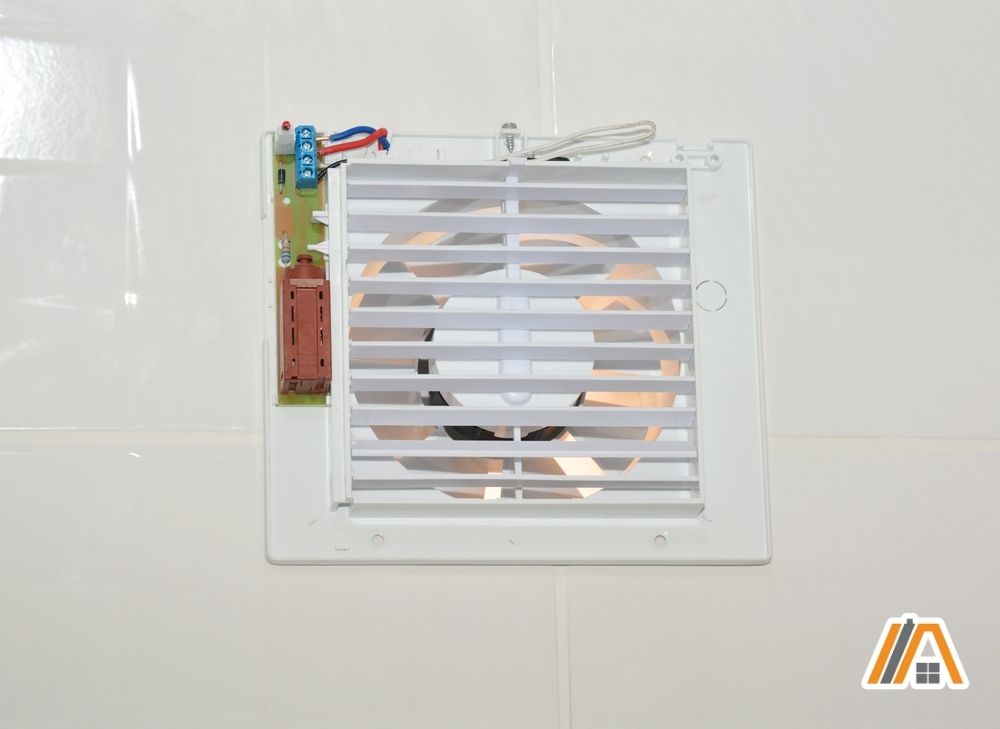
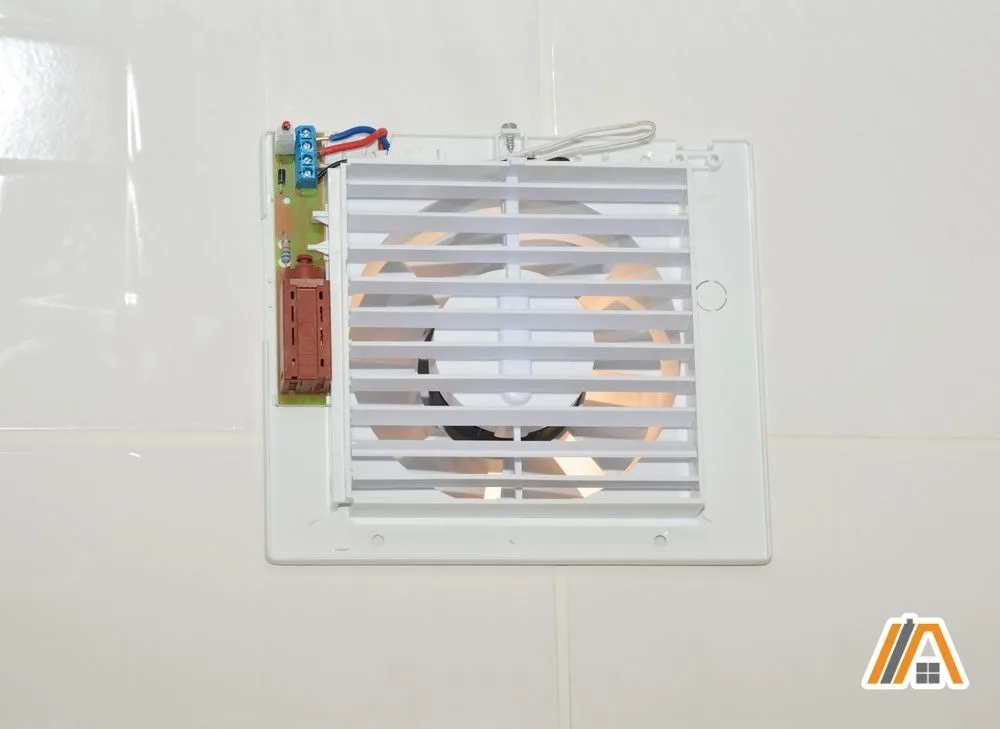
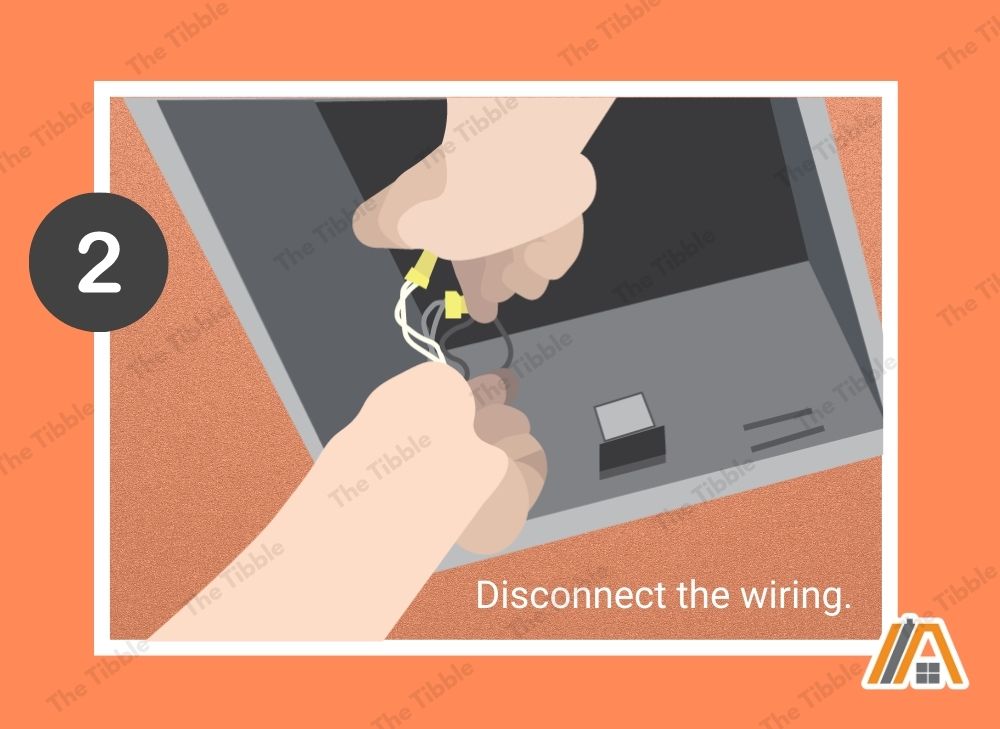
5. Disconnect the Wiring
Before touching any wiring, use your voltage tester to make sure that there is no power going to the fan.
An important thing to keep in mind every time you use a voltage tester is to test the voltage tester on a known electricity source to make sure it is functional before you trust it.
A standard extension cord powers some fans and plugs such as you will find on other appliances. If this is the case, it’s a simple matter to unplug the fan from the outlet, which may be attached to a roof truss.
If you don’t see a plug and outlet, you will have to undo the plastic connectors that join the fan’s wiring to your house’s wiring, which emerges from the ceiling.
These connectors may be hidden inside a junction box, which you would have to unscrew.

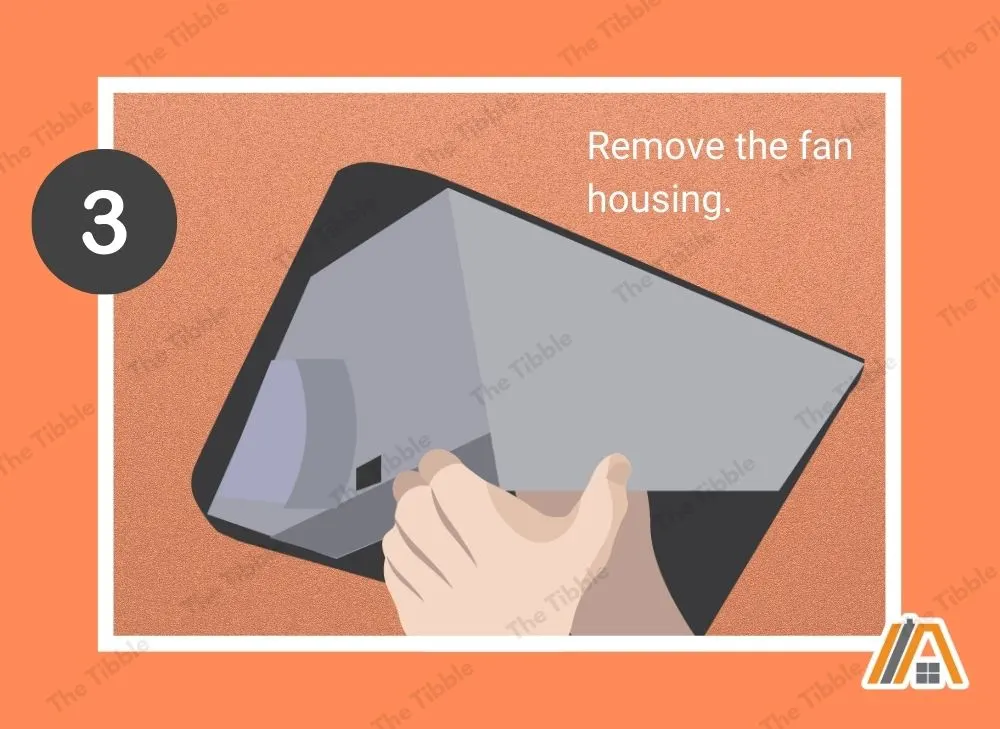
6. Remove the Fan Housing
According to specifications, the space between your fan’s housing and the hole cut to fit it into the ceiling or wall should be sealed with caulking or foam.
You may need to cut through this seal and any other fastenings with a knife.
Once you have detached the housing from the ceiling, remember that you will have to support its weight while you disconnect the vent pipe.

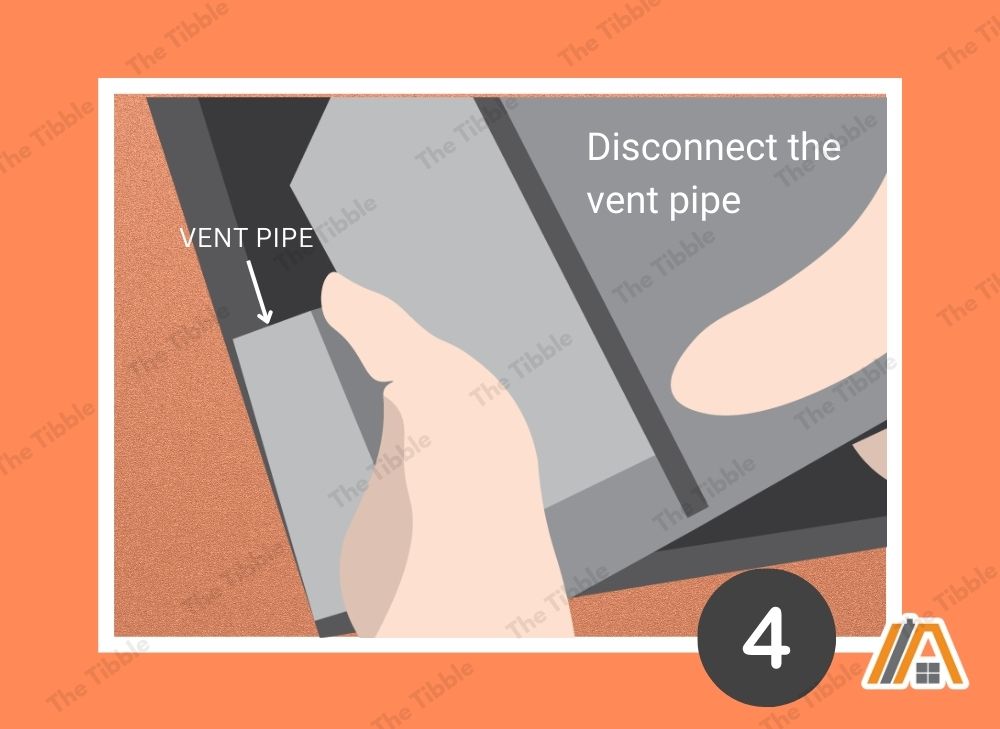
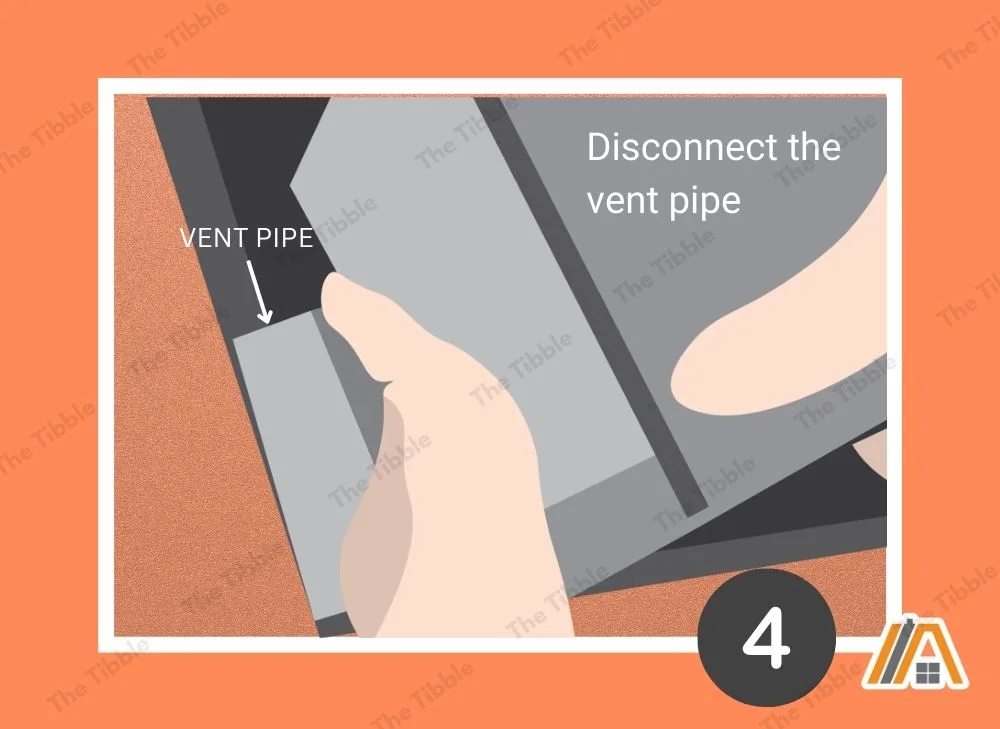
7. Detach the Vent Pipe
The vent pipe is the exhaust for your bathroom fan. It runs to a vent on one of the outside walls of your house or through the roof.
The replacement fan will need to connect to this same vent pipe, so be careful not to damage or shorten the pipe when removing your old fan.
The fan may be connected to the vent pipe by HVAC tape. If so, cut it carefully with a craft knife or peel it away.
Alternatively, it may be attached by a clamp that you can unscrew and remove. Once detached, gently pull the fan away from the pipe, keeping clear of dust that may fall.
If you’ve carefully followed the above steps, you will have safely and easily disconnected your bathroom ventilation fan.
Reasons to Remove and Replace Your Bathroom Fan
Bathroom fans play an important role in ventilating your home, preventing the growth of damaging mold and mildew, and ensuring the high quality of the air you breathe. In my previous article, I have listed the bathroom fan as the best way to prevent mold in the bathroom.
So, if one or more of the following three situations apply to you, you may want to disconnect and replace your bathroom exhaust fan.
Situation 1: The Fan is Very Old
Bathroom fans are relatively long-lived, but they don’t last forever. In fact, the average bathroom fan has a lifespan of ten years.
If you have recently moved into a home that has been occupied for several years, there’s a good chance that your bathroom fan is nearing the end of its useful life.
If your bathroom seems extremely foggy during and after a shower, and moisture accumulates on surfaces such as the mirror and the top of the vanity instead of dissipating, your fan may be clogged or need replacing.
If you notice the noise of the fan changing over time (for example, an old, noisy fan may become quiet, or a newer quiet fan may develop a rattle), this is also a good sign that it needs replacing.
Before going to the trouble and expense of a replacement, check that the vent is not blocked and replace the filter to check whether that improves the fan’s performance.

Situation 2: The Fan was Badly Installed
A poorly installed bathroom exhaust fan does not remove the moisture from your bathroom effectively and leads to poor ventilation in the bathroom.
Signs of poor ventilation include black mold growth or mildew on the ceiling and walls of your bathroom, the edges of your shower, window sills and edges, and any sealed edges, such as around your sink.
If you have mold problems check out my guide on how to easily remove mold with vinegar.
The paint on the ceilings and walls may also peel or blister, and you may notice a musty or pungent smell.
Your old fan may also not be rated for the size of your bathroom. Many cheaper fans are rated for small spaces, so if a previous owner was trying to save money, they might have chosen a fan that is not up to the job of properly ventilating the bathroom.
It’s important to check the fan’s rating and match it to the volume of the bathroom—that includes the ceiling height as well as the floor area.
In my article about how bathroom fans are rated, you can find out which one will be optimal for your bathroom.
Situation 3: The Luxury Decision
Maybe the fan in your bathroom does its job, but so loudly that it turns your morning shower into a rude awakening that you could do without.
Or maybe you don’t like having to flick a switch at the wall or pull a cord to turn on the fan—you’d rather the process was seamless and automatic.
Perhaps your fan is connected to the light and turns off when you leave the room before it has fully cleared the moisture generated by your steaming hot bath.
Or, perhaps it is an energy-hungry old model, not suitable for your eco-friendly lifestyle.
 Thin fan")
If you are remodeling your home, making different and more modern design choices in your bathroom can be a great way to update and freshen up the space.
Choosing the Right Replacement
Whatever your reason for replacing the fan, you should make sure you take the time to choose a new fan that meets your needs and satisfies regulatory requirements.
The most important step is choosing a fan that is correctly rated for the size of your bathroom.
Bathroom Fan Size
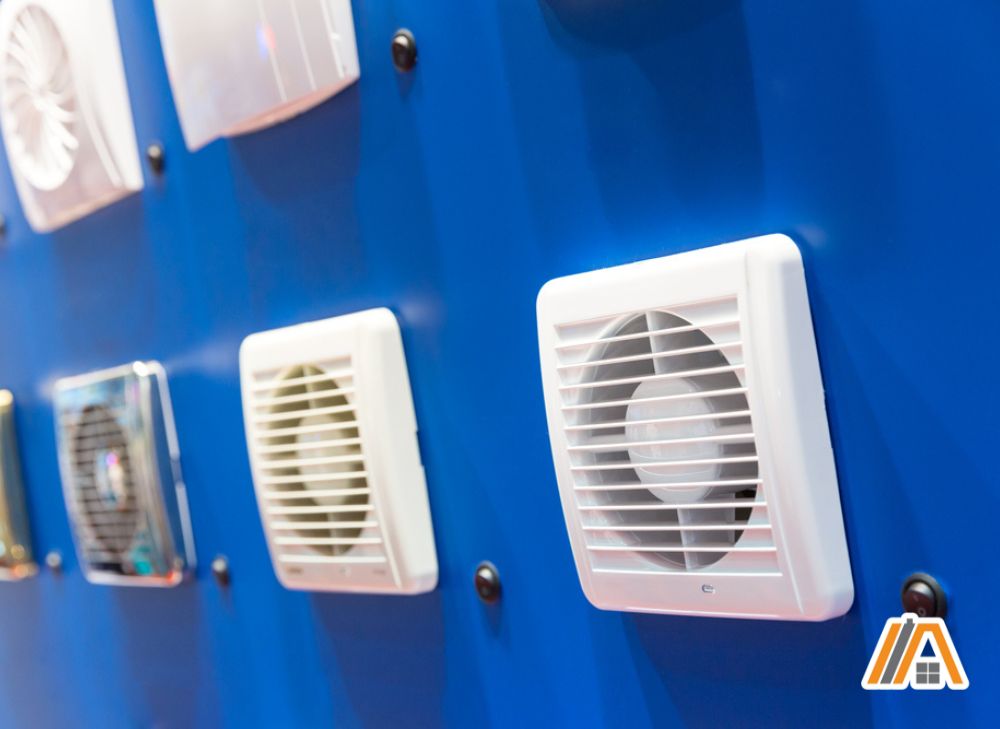
The most important thing is the actual physical size of the fan. By replacing it with a fan that is similar to the one you have now you save yourself a lot trouble.
Bathroom fans are not standard size. It is best to measure the opening and find a fan with a similar size housing.
Calculating CFM
The airflow rating of a fan is measured in CFM (cubic feet per minute), which you will then need to match to the volume of air in your bathroom.
You can do a rough calculation to estimate what CFM you will need. Measure the length and width of your bathroom and multiply these dimensions together to calculate the floor area.
You will require at least one CFM per square foot of floor area, but most experts recommend adding 50 CFM per toilet, shower, or basin.
You will also need a higher CFM if your bathroom has very high ceilings because this increases the volume of air in the room.
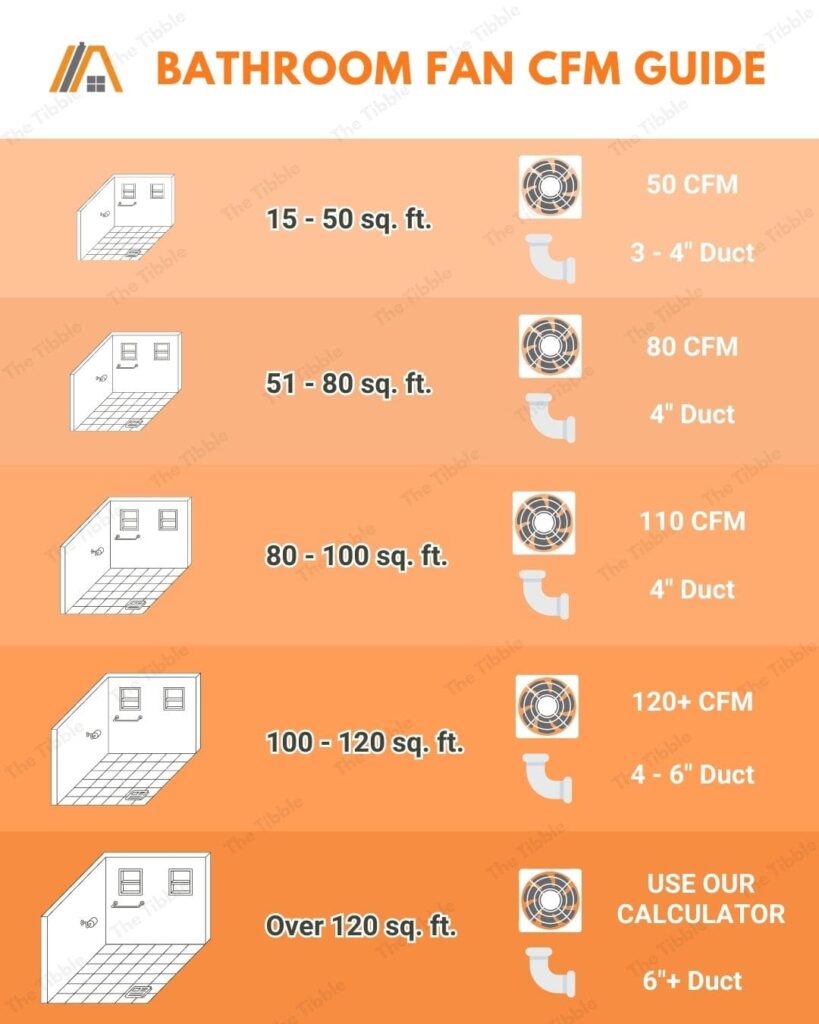
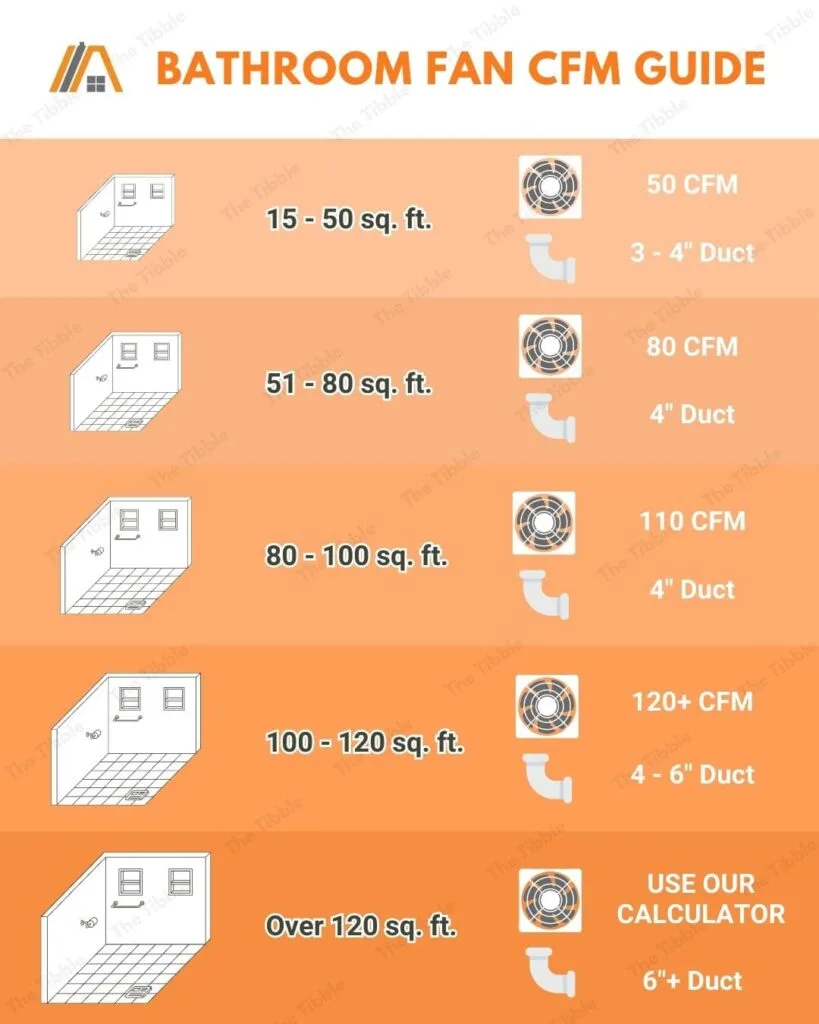
If in doubt, consult a good salesperson or even the website you’re using to buy the new fan. There are many resources available to help you make the right choice.
Choose a Design that Suits You
You may also want to consider the options open to you in choosing how and when the fan runs.
For example, some fans run continuously, whether the bathroom light is on or off.

Alternatively, you can connect the fan directly to the light switch. This means when you turn the light on, the fan turns on too, and when the light is turned off, so is the fan.
Some fans run via a timer so that the fan turns on with the light and then runs for a few minutes after you turn the light off.
Some models can also be connected to a humidity meter and will turn on when the moisture in the air exceeds a set level.
A humidity meter will help you avoid wasting electricity by leaving the fan on when it’s not needed, but will also help protect your bathroom from mold and dampness by switching the fan on whenever the air in the bathroom is moist.
Final Thoughts
Disconnecting and replacing a bathroom fan may seem like a simple task, which is why many people leave it for late on a Sunday afternoon when there isn’t much time for adequate preparation or room for error.
But the bathroom fan is integral to your home’s proper ventilation. Remember that it is also essential to keep legal regulations and safety in the front of your mind when dealing with electrical fittings to avoid fines or risk injury.
The bottom line is that research and preparation are key. Take your time and make sure you have the right tools. Doing so will provide you with the safest and best outcome for your bathroom.