Undermount sinks offer a sleek and seamless look, a little extra counter space, streamlined cleaning, and you can hide the caulking that is often visible on drop-in sinks. There’s also more leeway with matching the cutout to the sink because you showing the sink rim and not showing it are both acceptable options.
When it comes to gaps between undermount sinks and countertops, I will assume that you mean the overlap (or inverse overlap). But we will also talk about the unwanted gap, i.e., when the sink does not sit flush with the counter, which is a risk with this type of installation.


The standard reveal gap for an undermount sink is 1/8", but can also be increased up to 3/8" comfortably. Less than 1/8" makes it an alsmost zero reveal installation. More than 3/8" allows dirt and water accumulation on exposed sink rims or weakens overlapping countertops.
Types of Reveals (Gaps)
When we talk about undermount sinks, we don’t call the horizontal distance between the cutout and sink rim a gap. Rather, it is referred to as a reveal.
Undermount sinks can have three different types of reveals:
- Positive: the counter connects in a way that shows some of the sink rim.
- Negative: the counter overhangs slightly beyond the sink rim.
- Zero: the counter is aligned precisely with the sink rim without exposing or overhanging it.
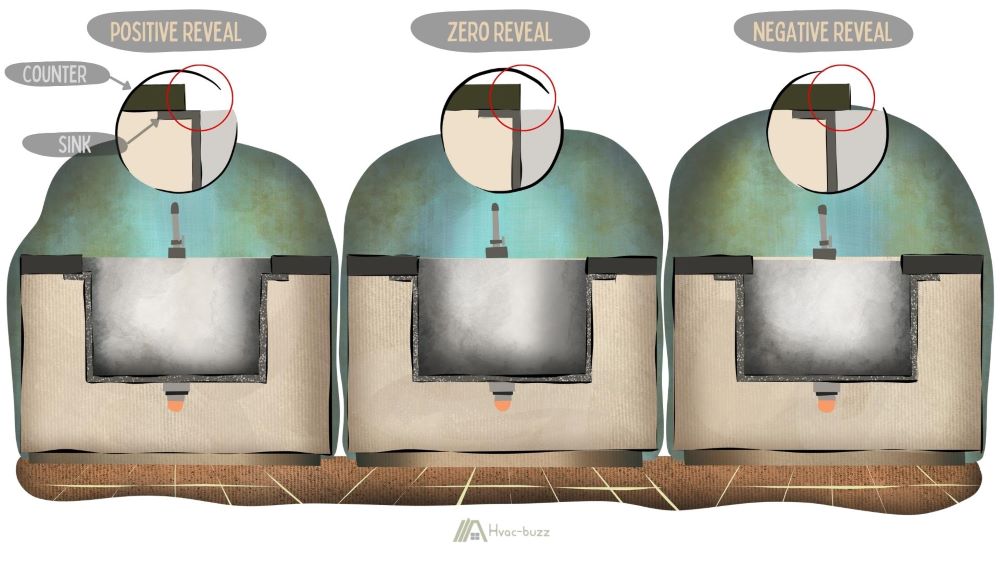
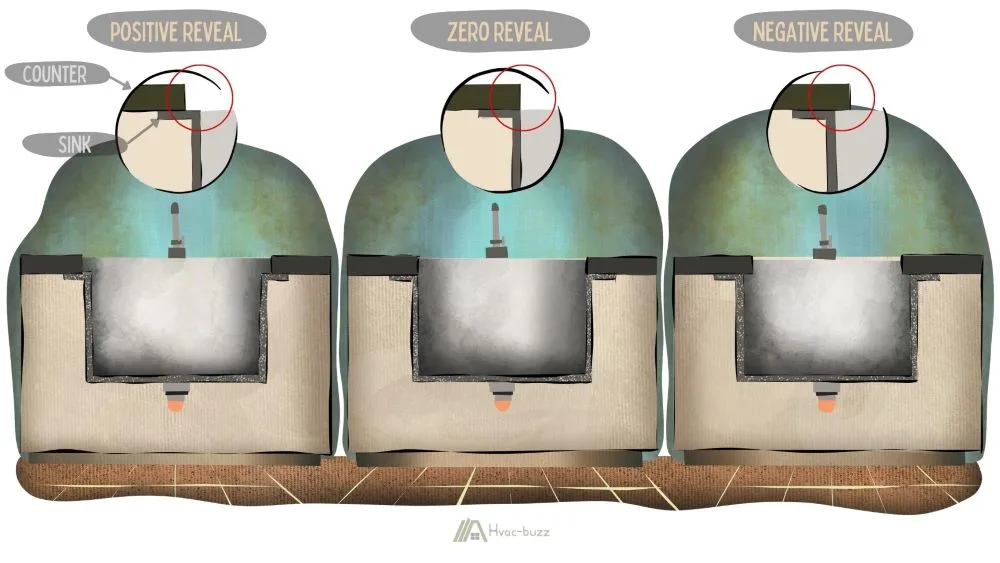
You should never have a gap between the counter and the sink with any of these reveal styles. The sink should be installed flush with the bottom of the countertop.
Positive Reveal
A positive undermount sink reveal can be a purposeful, stylistic choice, but it can also be your saving grace if your new sink is smaller than the previous one or you had a mishap when measuring your cutout.
The standard size of a positive reveal is 1/8″. This is quite small, so reducing it would practically turn the positive reveal into a zero reveal.
Increasing the reveal size is possible but the recommendation is to avoid exceeding 3/8″.
As you will see from the list of cons below, the exposed sink rim is a catch point for water and dirt. The larger this space is, the more water and dirt can gather and the more likely it is to do so.
In addition, you don’t want the point of attachment to be too near the edge of the sink as this makes it more likely to fail.
Pros
- It requires less precision for the fitting, which makes cutting the counter easier.
- You have full access to the sink with no overhang from the counter.
Cons
- It makes cleaning more difficult as dirty and grime tend to gather on the exposed lip.
- It detracts somewhat from the convenience of being able to sweep crumbs and mess directly into the sink as these things get caught on the lip.
- Water can gather on the lip, which increases the potential for mold growth.
- You will still see the caulk seal where the sink and counter meet. Avoiding this look is often one of the reasons people opt for an undermount installation.
Negative Reveal
Another reveal choice is the negative reveal. This is when the sink is fitted so that there is an overhang of the countertop over the rim of the sink.
It creates a more integrated look for the sink space, having the counter almost disguise the sink.
Again, the standard length of the negative reveal is 1/8″, but you can comfortably increase this to 3/8″.

Shorter than 1/8″ is not going to be a problem, but you may end up with a zero reveal if you reduce it too much. Longer than 3/8″ can compromise the integrity of the overlapping pice of counter, making it more susceptible to chipping or even breaking off in larger chunks, depending on the material.
Pros
- It creates a cohesive and continuous look.
- It is easy to clean as dirt doesn’t gather on the lip of the sink.
- It offers more leeway with the fitting as the edges don’t need to align perfectly.
Cons
- The edges of your countertop are going to experience more wear and, as a result, are prone to damage, such as chipping.
- The overhang can easily hide dirt, mold, and mildew.
Zero Reveal
A zero reveal is super satisfying to look at. Obviously, there are no gaps for this one, but I wanted to give you the pros and cons just in case you didn’t know that this was an option and are interested in exploring it.
Pros
- It looks really sleek.
- The caulking is hidden.
- There is no chance of dirt and water accumulating, so they are easy to keep clean.
- The full sink is visible from above the counter.
Cons
- You have to get the measurements just right.
- Chipping of the countertop is possible, although less so than with a negative reveal.
The Wrong Kind of Gap Between Sink and Counter
An issue that arises with undermount sinks is that they can start to separate from the underside of the countertop. Perhaps they never sat flush to start with.
This kind of gap is not one that you want. It represents poor installation and can lead to a whole host of problems.
Problems With a Gap
Any gaps will prevent you from sealing the sink edge correctly. This will result in difficulties with dirt and grime building up in the spaces (that are not easy to clean) and making the whole area a little less hygienic.

In the kitchen, you might find that crumbs and bits of food can get in there and become stale and rot. In the bathroom, you will likely have to clean out the sludge of old soap and other products from the deep recesses of your sink lip.
Without proper sealing, water is also able to gather in those spaces. Having water there can cause the growth of mold and mildew. It can also potentially damage your countertop (if it’s more porous) and can get into your cabinets.
If water can get into and sit inside your cabinets, you will likely experience problems with the finishes inside, such as peeling and warping. The wood of your cabinets can even rot and require complete replacing.
Having water leaking into a cabinet will also make it challenging to use as anything you store there would have to stand in water or get wet. Not to mention the damp smell you will have to deal with.
So, a gap between your undermount bathroom sink and the countertop affects what you can and cannot store beneath the sink
Why Would There Be a Gap?
It is important to install the sink (or make the cut-out) before fitting the countertops. If your sink is installed after the counters, the fit will be less precise.
A poor fitting can result in gaps between the counter and sink. This will also make it difficult to seal the sink to protect it from water damage and mold.

If the sink is incorrectly sized, you might end up with a large gap because of the difference between the hole cut from the counter and the too-small sink.
Another and more urgent potential cause might be the supports. Due to the weight of the undermount sinks, they are installed using supports and adhesives.
If the supports are not securely in place or the adhesive is not permitted to dry fully, your sink may be separating from your countertop and be on the verge of collapsing entirely.
How to Fix a Gap Between Undermount Sink and Counter
Caulking
There is always going to be a small gap. That is because sinks aren’t designed to make an airtight seal with your countertop. However, this small space is intended to be caulked over and sealed.
If you are struggling because the sealant is incomplete or damaged, you will need to remove and redo it.
After you cut and peel off the old caulk, you need to buy appropriate caulking, such as the GE Supreme Silicone Kitchen and Bath Sealant Clear (amazon link), and re-seal the sink. You can use your finger or a grout tool to smooth out the seal around the sink’s edge.
Replace the Supports
Undermount sinks are held up to the counter using support clips. If these clips are old, worn, or damaged, you may find that a gap has developed. You will need to remove the sink, clean up the area, and reinstall the sink with new supports.
If the gap is severe, you may need to consider replacing the sink with one of suitable dimensions. You will need to remove the sink and clean off all the previous silicone adhesives before installing the new sink.
Both the videos below and this video offer helpful advice on how to remove and install an undermount sink:
Redo the Countertop and Cut-out
Or perhaps, if your sink was the more expensive items between it and your countertop, you may consider replacing that section of countertop. If you replace the counter, you can install a countertop with an accurate cut-out for your sink.
DIY sink cut out in butcher block countertop:
DIY sink cut-out and polish with granite:
Sources
https://graniteselection.com/blog/how-to-install-undermount-sink-on-granite-countertop/
https://www.sinaarchitecturaldesign.com/2019/01/1656/
https://mensarjor.com/blogs/news/everything-you-ever-wanted-to-know-about-undermount-kitchen-sinks
https://www.apartmenttherapy.com/undermount-sink-kitchen-pros-cons-257717