When my friend finished renovating his bathroom last month, he found that the hot water faucet supplying his big, new tub was letting out only a trickle. On the verge of upgrading his water heater, he decided to try one last thing: on a hunch, he unscrewed the aerator from the faucet spout, and found the screen clogged with construction grit and gunk. After cleaning it all out, the faucet worked like a charm!
When it comes to plumbing, one little detail can make a big difference. A plumber recently told me that he hears a lot of people blaming aerators for the low hot-water-flow in their bathrooms.
“What folks don’t realize is that a bit of regular maintenance could solve the problem. Getting rid of your aerator is like throwing the baby out with the bath-water!” he added.
In this post, I’ll help you troubleshoot the most common aerator-related problems associated with water heaters, and answer the question of whether you really need an aerator at all. But first, we’ll need a bit of background on the different types of aerators out there.


A common cause of low water pressure in faucets is an improperly functioning faucet aerator, due to (i) aerator mesh clogged with construction debris, (ii) build-up in aerator of lime-scale from water heater, or (ii) too narrow (or clogged) opening in aerator flow restrictor.
Types of Aerators
An aerator is a device attached to a faucet (or tap) spout to control water flow by mixing air into the stream of water. By so doing, it helps create the feeling of high pressure water flow while actually reducing flow rate, thus conserving water, and in case of hot water, reducing energy wastage.
You’ve undoubtedly already experienced aerators that provide different kinds of water flow. The two aerator types most commonly used in household plumbing are bubble aerators and needle spray aerators.
Bubble aerators typically mix tiny air-bubbles into the water stream, creating a soft, white flow that doesn’t splash. These are very popular in bathroom fittings, especially for bathroom sinks.
Needle spray aerators force water into multiple (usually 18) tiny jets, creating an even spray like a miniature shower, instead of a splashy, uneven stream; spray aerators are preferred for kitchen sinks and utilities, and often found in public washrooms.
A third type of aerator provides ‘laminar’ water flow, which appears crystal clear, and is unmixed with air. This type is generally used in hospitals and health-care facilities, and is beyond the scope of this post.
But are faucet aerators really necessary? Do you have to have them on every water outlet in the house? If you’re not sure, don’t worry.
Here are some guidelines that can help you evaluate whether aerator you have on a particular faucet is the right one for the job – and whether it’s actually required.
Three Parameters Affecting Aerator Choice
1. Flow vs. Fill Usage
In activities relying on direct water flow, such as washing hands and doing dishes, faucet aerators can really improve efficiency and overall user experience. Having a faucet aerator ensures consistent water flow, even pressure, and avoids messy splashes. Keep in mind that for flow-based activities that require a larger volume of water (for example, when using a garden hose), an aerator might just get in the way and reduce work efficiency.
On the other hand, for activities that use a pre-filled volume of water, such as bathing in a hot tub, or filling up drums or other containers, an aerator might not be necessary, since consistent flow is not that important. Instead, a higher flow rate, unrestricted by an aerator, might be more efficient and save you time.
2. Inlet Water Flow Rate
Even if you’ve determined that a faucet needs an aerator, you still need to figure out what kind to choose. As described above, bubble aerators are preferred for bathroom basins. However, bubble aerators require a higher water flow rate, typically 1.5 gpm or above, in order to provide a good enough output.
For lower flow rates (less than 1 gpm), a needle spray aerator is ideal, as it provides better coverage at lower flow rates. For instance, if you live in a large building where water flow rate at individual outlets is greatly reduced, a needle spray may be a better option than a bubble aerator for your bathroom sinks.
3. Water and Energy Efficiency
The question of conservation is all-important, of course. A standard-flow aerator typically allows a water flow rate of about 2.2 gpm. If you really plan on bringing water consumption down, then installing aerators with a lower flow rate, for example, 1.5 to 2 gpm, is a good idea.
Low-flow aerators can be especially helpful on hot water faucets, where water and energy use both need regulation. If water and energy savings is your top priority, you’d be well-advised to choose a low-flow, needle spray aerator that limits flow to 0.5 gpm or even an ultra low-flow, at 0.25 gpm. (For more on the optimal setting for energy saving on your water heater, check out this post.)
Armed with these facts, let’s troubleshoot the most common aerator problems.
Aerator Maintenance 101
Here’s the easy-as-pie method to diagnosing and fixing clogged or faulty aerators.
1. Identify Aerator Type and Size
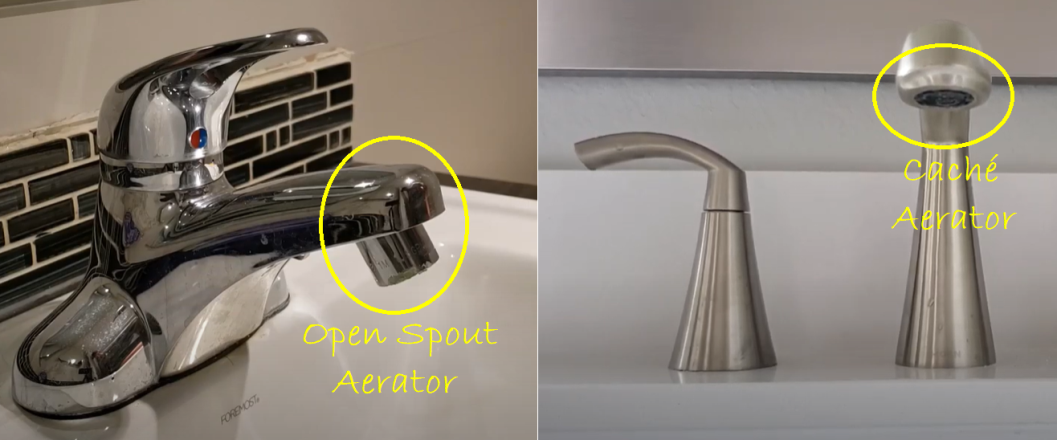
First, take a look at the problem faucet, and identify what kind of aerator it’s fitted with. Faucet aerators can either be the open spout type or the hidden or caché type (see image below).
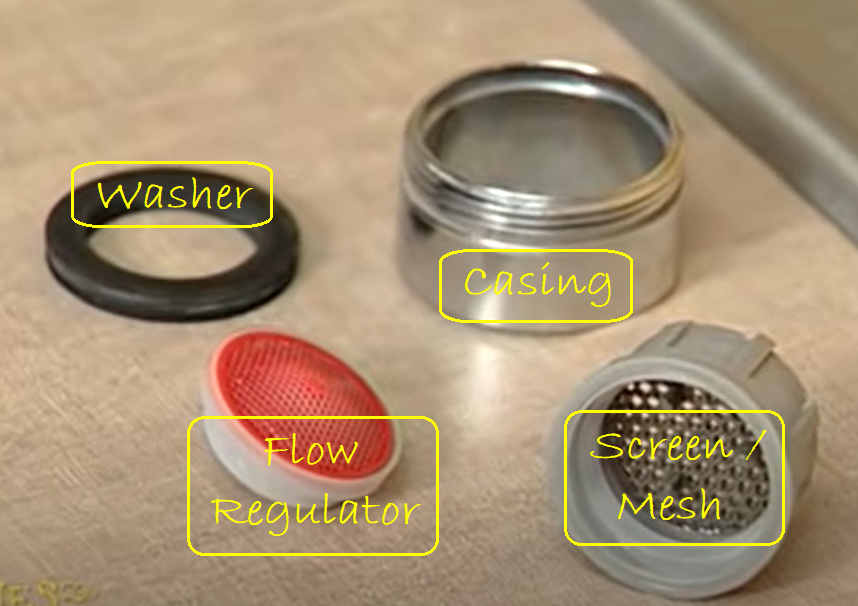
Open spout aerators typically sit inside an external housing or casing that holds the aerator. Caché aerators screw into the inside of the faucet spout. The aerator itself can usually be dismantled into one or more of the following parts:
- a wire mesh or screen
- a flow regulator (basically a perforated plastic disk)
- a rubber or neoprene washer
Open spout aerators generally come in three sizes, whose diameters correspond roughly to a quarter, a nickel and a dime:
- Standard open spout: Quarter (25¢)
- Junior open spout: Nickel (5¢)
- Tiny junior open spout: Dime (10¢)
Hidden or caché aerators typically come in four sizes:
- Standard caché: Quarter (25¢)
- Junior caché: Nickel (5¢)
- Tiny junior caché: Penny (1¢)
- Tom thumb caché: Dime (10¢)
2. Remove Aerator from Faucet
Detaching an open spout aerator can usually be done by hand, by simply unscrewing the metal casing from the faucet spout. If the casing won’t unscrew easily, use a simple wrench* or a pair of pliers* to twist the casing loose from the faucet threading.
For a hidden or caché style aerator**, though, you’ll need a special tool that typically comes with the aerator. These tools are specific to the aerator size, so you’ll need the exact right one.
For a quick demo of how to detach a caché aerator, see the video below.
*Tip 1: Wrap a hand towel or soft rag around the faucet spout before using a wrench or pair of pliers to unscrew an open spout aerator casing, to avoid scratching and other damage to your shiny (and expensive!) plumbing fittings.
**Tip 2: For a caché aerator that’s firmly stuck and refuses to come off the faucet, tie a plastic bag filled with a strong white vinegar solution to the faucet spout, and leave overnight. Use rubber bands to secure the bag in place, and make sure that the spout is fully immersed in the solution. The next morning, unscrewing that aerator should be a breeze!
3. Clean Aerator
As described earlier this post, poor flow at water outlets is often (but not always) due to aerator issues.
The mesh screen or the flow restrictor within an aerator can become clogged over time with grit and other solid matter. This problem is aggravated in hot water outlets, where lime-scale from the water heater adds to the build-up in and around the aerator.
Once you’ve removed the aerator from the faucet, dismantle the parts. Using warm, soapy water and a toothbrush, clean the individual parts of the aerator (see image below). For stubborn limescale deposits, soak the dismantled parts in a strong white vinegar solution for two to three hours before cleaning manually.
At this point, it is also a good idea to flush the faucet, by allowing water to run continuously for a minute or two. This will dislodge any debris clogging up the faucet spout.
4. Replace Aerator
Re-assemble the parts of the cleaned aerator, taking care to follow the correct order. Then, screw the aerator snugly back onto the faucet using your fingers. In case of a caché aerator, screw it back in place using the tool provided.
In case the aerator is too badly clogged to allow for a thorough clean, it might be best to replace the aerator with a new one. (Amazon offers a great range of aerators,) If this seems necessary, make a careful note of the aerator size (see section above) and threading type.
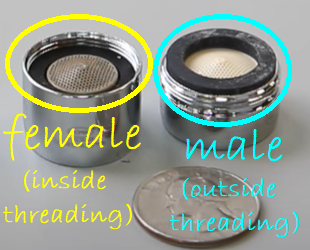
Most faucet aerators have either male or female style threading: in the former, the threading is on the outside, whereas female style aerators have the threading on the inside (see image below).
Of course, the safest bet would be to carry the old aerator to your local hardware store and ask for an identical replacement.
Now that you’ve got the aerator cleaned and replaced, your hot water faucet should go back to giving you ample flow. However, if you’re still having low flow issues, the problem probably lies elsewhere, further upstream.
Other Likely Suspects in a ‘Low Hot Water Pressure’ Scenario
Aside from aerators, these are some of the other likely causes of low hot water flow:
1. Partially Closed Inlet Valve
Simply open up the hot water inlet valve (typically located below the wash basin) as far as it will go to increase hot water flow. In fittings where a mixer is installed to provide a mix of hot and cold water through a single faucet, it is necessary to adjust the hot water valve screw, usually concealed beneath a metal exterior casing.
(Watch from 1:10 to 2:45 in the video below for step-by-step instructions on how to do this.)
2. Clogged Inlet Pipes
If the inlet pipe carrying hot water is clogged with grit or lime-scale, this might also prevent your hot water faucet from giving you optimal flow. To fix this problem, you may need to flush the pipes with a strong vinegar or other descaling solution. For details on how to do this, check out this helpful post.
You now have all the information you need to find and fix the problem behind your poor hot water flow issues. So let’s get to it!